
Orca Slicer Not Working Solutions (Printer, Bed Mesh Errors)
There are multiple reasons why your Orca Slicer may not be working, including printer configuration issues, complexity crashes, corrupted files, spiral errors, improper slicing placement, incorrect settings, and more. Lets explore all possible errors and solutions
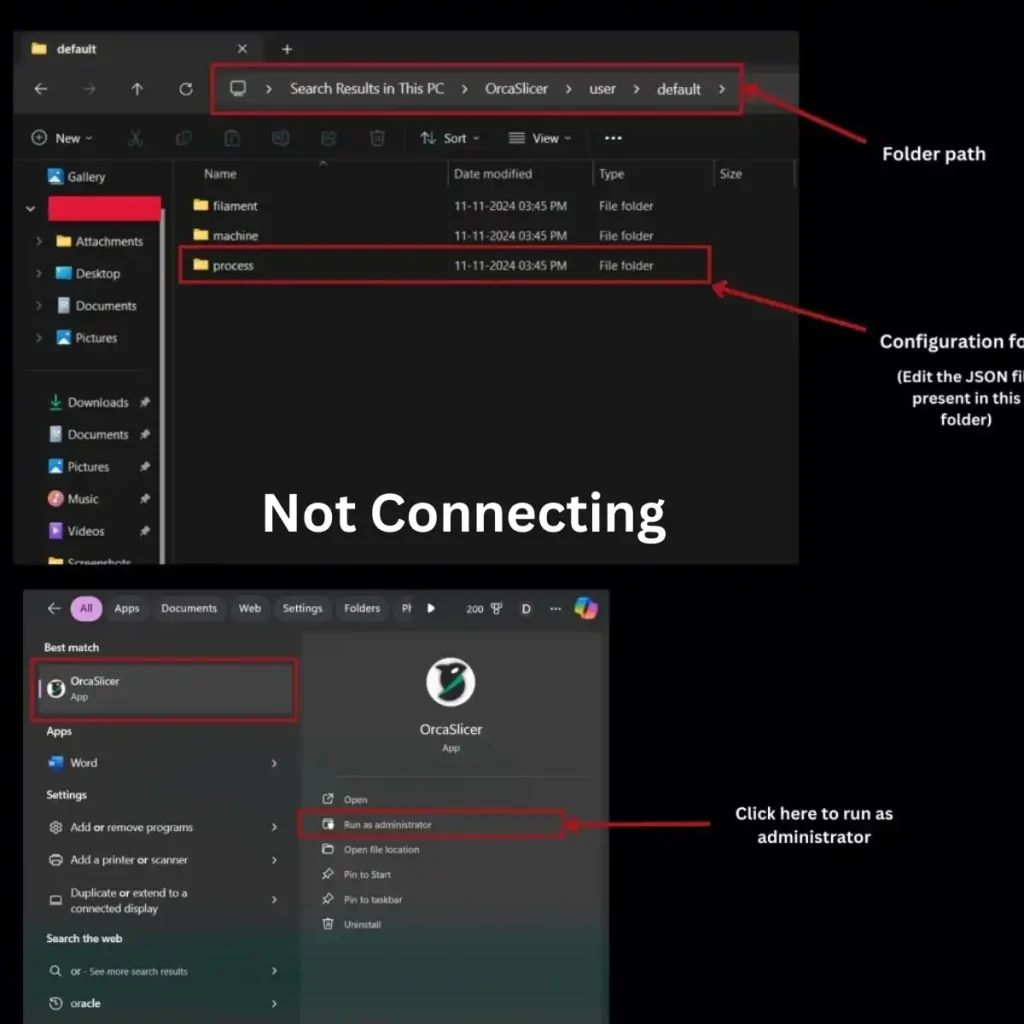
Not Connecting To Printer
Problem
Mostly, the persons face 404 error while connecting the orca slicer to the printer, so to resolve this issue, follow the below steps:
Solution
- Ensure the slicing software IP address is correct and is available for receiving files.
- Connect both the computer and the printer to the same internet connection.
- Ensure that the fluid is configured and available for receiving uploads from the external slicer.
- Restart both applications and the Wi-Fi to resolve any temporary discords.
- Manually upload the slicing files and save them on the computer’s memory.
Not Finding Printer
Problem
If you are unable to find your printer on your targeted device, then there must be an internet issue, incorrect setting, or hardware issue. So follow the below guide to resolve this problem:
Solution
- Ensure that your computer and printer are both connected to the stable and same Wi-Fi connection.
- Powered on your printer and ensure it’s working properly.
- Must ensure that your Orca slicer is compatible with the printer.
Not Using Bed Mesh
Problem
Your printer doesn’t have bed mesh, bed mesh is not loaded properly, configuration issue, and glitch in your orca slicer; all these reasons are preventing your orca slicer from using the bed mesh. The solution to this problem is explained below:
Solution
- Ensure that your printer has bed mesh launched and working efficiently before printing.
- Verify that your printer’s version is updated and is compatible with bed mesh technology.
- Make sure your orca slicer is configured to use the bed mesh.
- Update your orca slicer and resolve glitches, if any.
Not Generating Reports
Problem
Software issues and incorrect settings must be the reasons that are blocking your printer from generating reports. To solve this issue by following the given steps:
Solution
- Ensure that your orca slicer is allowing the printer to generate reports.
- Verify that your orca slicer has the specific space to store the generated reports.
- Provide enough data to the orca slicer to generate reports quickly.
- Check that you’ve not corrupted the orca slicer installation process.
Not Working On Mac
Problem
A bug in the Orca slicer and outdated technology is preventing the printer from working properly on your Mac. Follow the below easy steps to resolve this issue:
Solution
- Rename and re-launch the orca slicer.
- Use the latest or beta version to get the best printing results.
- Ensure that your printer is compatible with your macOS version.
- Install the homebrew software management on your MacBook.
- Try installing the Orca slicer again with the homebrew command.
Not Showing All Filaments
Problem
If your orca slicer is not showing all filaments, then there must be a configuration or software limitations issue. Let’s see the guide to solve this problem:
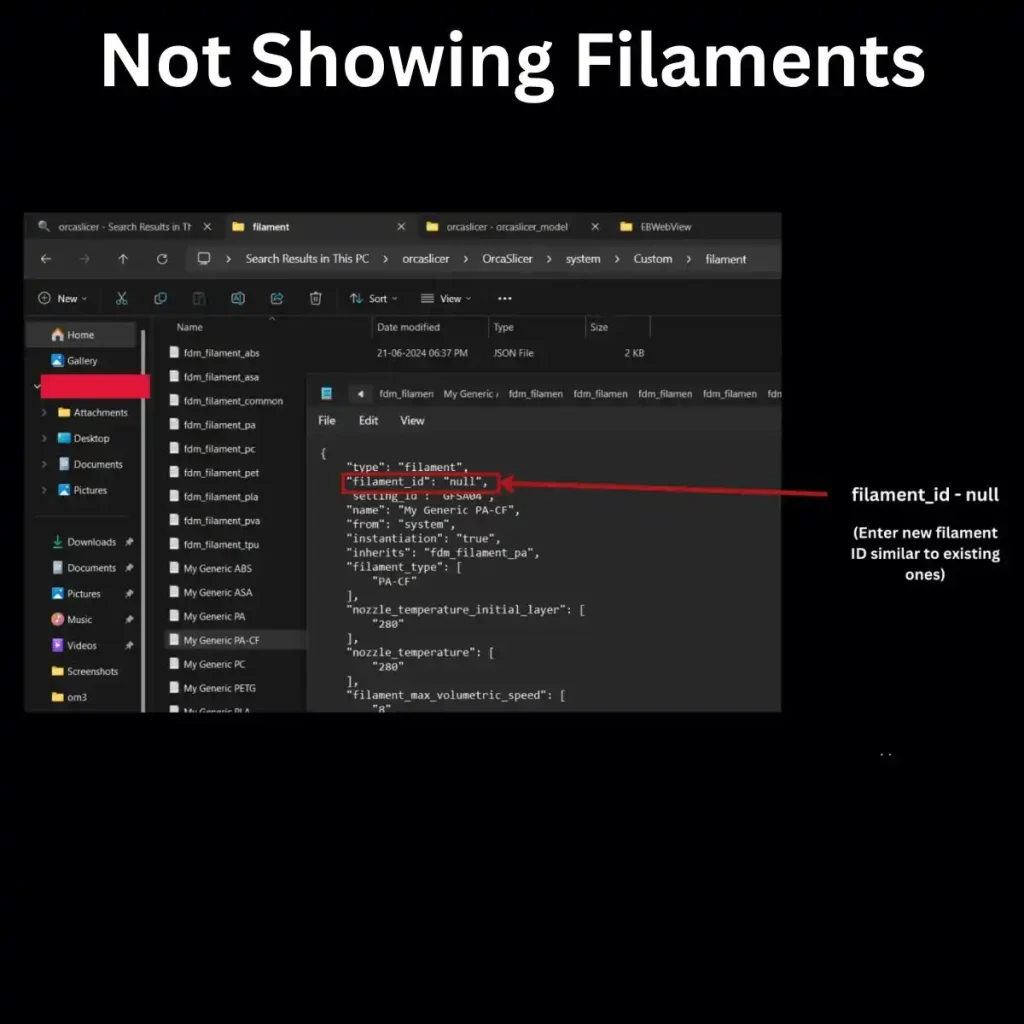
Solution
- Manually load the filaments files.
- Ensure that all the filaments are compatible with your orca slicer.
- Ensure that your slicer is updated and is free from all kinds of bugs.
- Verify that your G-code setting in the orca slicer is the same as the filaments setting.
Not Responding
Problem
If your slicer is not responding or opening, then you must review configuration issues and obey the mentioned step-by-step guide:
Solution
- Try restarting your computer.
- Launch the new version of the orca slicer if required.
- Ensure that your system graphics drivers are updated and are not preventing apps from working.
- Try antivirus software to remove the virus if you have any.
- Must check your slicer logs and fix the errors.
Not Printing
Problem
If your printer is not printing, then there must be an issue between your computer and printer connection. So, to solve the printing issue, follow the below steps:
Solution
- Ensure that your printer is running effectively and is connected to stable Wi-Fi.
- Check that the nozzle and printer have a suitable temperature.
- Ensure that your printer all parts are working correctly.
- Verify that the connection between the computer and the slicer is not affected.
Non Planer Slicing
Problem
The non-planer slicing ruins the printing quality and affects users’ 3d models, which frustrates users. Now solve this issue with the following quick steps:
Solution
- Ensure downloading or updating your orca slicer to the latest beta version.
- Enable the non-plane slicing in your printer.
- Ensure that your printer is compatible with non-planer technology.
- Try inspecting your 3D model using mesh repair tools to avoid errors.
- Test your printer non-planer slicing on a basic model and preview to identify and resolve the problem.
Non-Manifold Edges
Problem
Open edges, incorrect face orientation, intersecting faces, and missing faces are the common issues that lead to non-manifold edges. Let’s resolve this problem with some quick steps:
Solution
- Find and fix all the issues in the orca slicer.
- Use the blender or any other software to inspect and resolve the non-manifold edges.
- Once you have fixed all the problems, try a test print to determine whether the problem has been resolved.
Not Saving Settings
Problem
Sometimes, the orca slicer does not work with saving files or images to the assigned library. Simply solve this problem with the below steps:
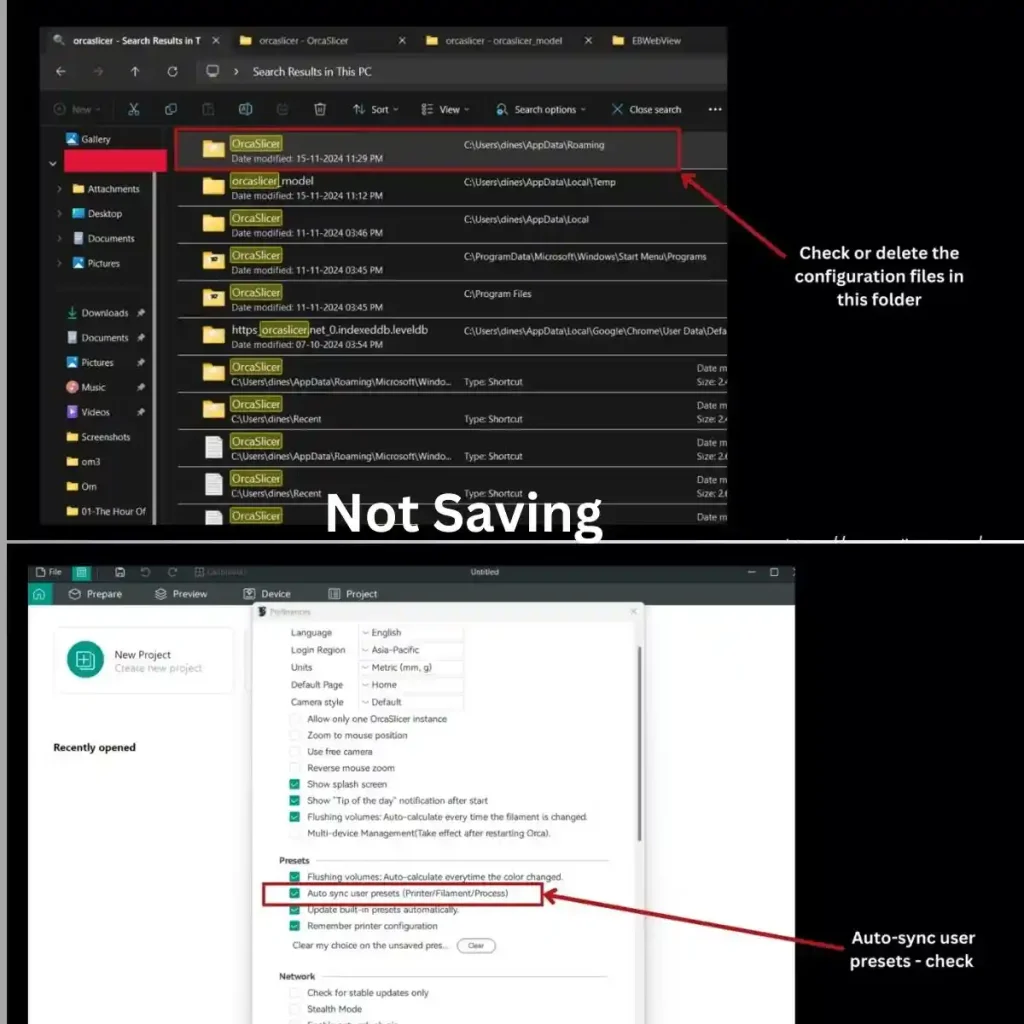
Solution
- Always save your profile by making any changes.
- Ensure using the latest beta orca slicer.
- Check your configuration and fix the issues if you have any.
- Enable the ‘auto sync user presets’ setting.
- Try contacting the orca slicer support for any other technical issue.
Partial Slicing / Spiral Mode
Problem
If your orca slicer is slicing half of the file and displaying any error, then follow the below guide:
Solution
- Delete the Orca slicer folder on your computer
- Reset all the old settings.
- Install the orca slicer again.
Orca Slicer Not Setting Filament Temperatures
If Orca Slicer is not saving or setting filament temperatures correctly, it may cause incorrect heating and affect print quality.
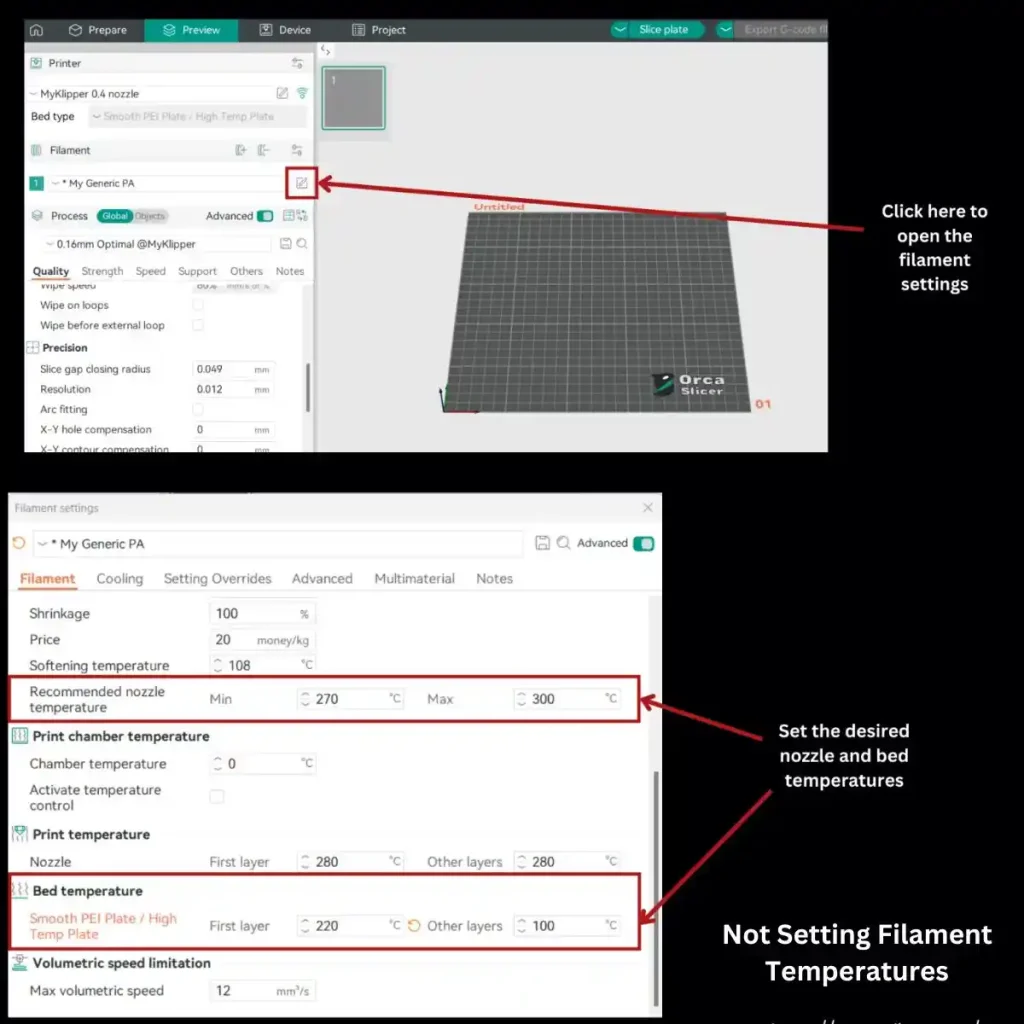
To fix this, go to the Filament section in the slicer sidebar, click the notepad icon with a pencil to open filament settings, scroll down to the Bed Temperature and Nozzle Temperature fields, enter the correct values (e.g., Bed Temperature: 220°C), and save the changes. Also check calibration of orca.
Some Technical Errors and Solutions
| Error | Solution |
|---|---|
| Program crashes after slicing | Update Orca Slicer to the latest version. Check system compatibility. Restart the program and try again. |
| Purge tower placed off the build plate | Adjust the purge tower settings in the slicer. Manually reposition it before slicing. |
| Unable to create a custom filament profile | Use a system profile like “Creality Generic PLA” instead of a user profile. |
| LAN-only mode fails on Bambu X1C | Ensure correct IP, access code, and printer details. Restart both the printer and Orca Slicer. |
| Printer setup loop keeps asking for information | Verify network connection and ensure the correct details are entered. Restart the software. |
| Installation fails because Orca Slicer is running | Close Orca Slicer before installing a new version. If prompted, choose “Retry” after closing the program. |
| Cannot leave unused filament slots empty in multi-material printing | Assign dummy filament or select the least used slot for an inactive filament. |
| Scaling removes painting from the model | Save the painted model separately before scaling. Manually repaint after splitting. |
| Auto Arrange fails on a circular bed | Set “Best Object Position” to a different value than X0, Y0 to fix alignment. |
| Increasing wall count adds seams at modifier intersections | Use modifier settings carefully to avoid unwanted seams. Adjust wall count without affecting intersections. |
Well if you are worried with orca issues you can use creality Slicer, Prusa Slicer or Cura Slicer